Avid’s new Smart Tool promises a more intuitive, drag-and-drop approach to timeline editing and is designed to compete head-on with Final Cut and Premiere. But for many long-time Avid editors, the first response is, “how do I turn it off?”
The dilemma is a classic one and goes to the heart of how we learn to use any tool. For newbies, an interface wants to be immediately obvious and welcoming. But power users want speed. The best interface combines elements of both and is malleable enough to grow with you as your needs evolve.
I’m just finishing a show on MC5, and have tried several approaches to the Smart Tool. Here’s the setup that I’ve settled on (so far):
- Upgrade to one of the recent patch releases (5.0.3.1 – 5.0.3.4). Trim mode in these builds will be much more familiar to long-time Media Composer users. Then enter trim mode by lassoing, or by hitting the Trim Mode button (not the Smart Tool). This gives you something closely approximating old-style trim mode. For details, see this post.
- Go to the Edit tab of Timeline settings and select the following. You may also want to select “Clicking the TC Track or Ruler Disables Smart Tools.”
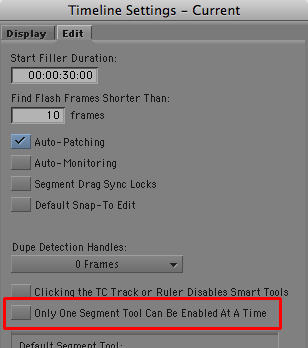
- Then activate only one Smart Tool — the keyframe tool. Leave all the others off. This gives you permanent access to audio keyframes, which matches past behavior. But more important, because you are leaving one tool on all the time, the tool palette won’t reset itself when you start up MC. It’ll come back as you left it when you quit. (If a tool is on when you quit, that’s the way the system will start up. If nothing is on, the tool resets itself.)

- Assign the segment tools to your keyboard and turn them on and off from there, as needed. (By default, you’ll find them on Shift-A, and Shift-S.)


You’ll probably have to do some experimentation to get things to work for you, but those are the key ingredients in creating a more familiar, version 4-style editing experience.
Article from splicenow.com
